Puy Lentils

This dish of lentils has become something of a regular visitor to our dining table. It’s relatively easy and quick to make and gets eaten up. It’s a deep rich warming dish, great for a cold winter’s day. It goes well with roasted or grilled meats, but can be eaten as is on its own.

Ingredients

Splash of olive oil
One diced onion
Diced red pepper
Smoked Pancetta
Chopped mushrooms
Knob of butter
A tbsp of flour (I used gluten free flour)
Stock
Tomato puree
Merchant Gourmet Puy Lentils

Dice the onion and the pepper.

Heat a large deep frying pan, once hot, add a splash of olive oil. Cook off the pancetta, then add the onion and red pepper, cook until softened. I then add some chopped mushrooms for flavour and colour. At this point you could add some other things. I have in the past used sliced baby courgettes.

If there is fat in the pan, then add the flour, otherwise add the knob of butter, in order to help create a roux and ensure that the sauce thickens.

Once the flour is incorporated into the mixture, add some stock. The choice is up to you, I actually quite like a deep beef stock, but vegetable stock works well too. Then add some tomato puree.

Depending on your taste, just add some ground black pepper (or even a little chilli for heat). The dish doesn’t need extra salt as the stock and pancetta have plenty for this dish.

Cook until the sauce has reduced.

Add the Puy Lentils. I use the Merchant Gourmet pack of puy lentils, which are already cooked and work well in this dish.

Merchant Gourmet Puy Lentils

These tasty lentils have a delicate, slightly peppery flavour, and were grown in Le Puy-en-Velay, in France. They’ve been simply cooked with water, onion, bay leaf and a dash of olive oil, and are a fantastic base for summery salads.

Warm the lentils through thoroughly and serve.

Variations I have made include adding Polish sausage to the dish, or slow cooked belly of pork.

Another variation is to use Merchant Gourmet’s Tomatoey French Puy & Green Lentils.

Merchant Gourmet’s Tomatoey French Puy & Green Lentils.

These are Puy and Green Lentils, cooked in a rich sauce of sun-dried tomatoes and fresh basil with onion and garlic.

When using this pack I omit the tomato puree.

Rainbow Cake

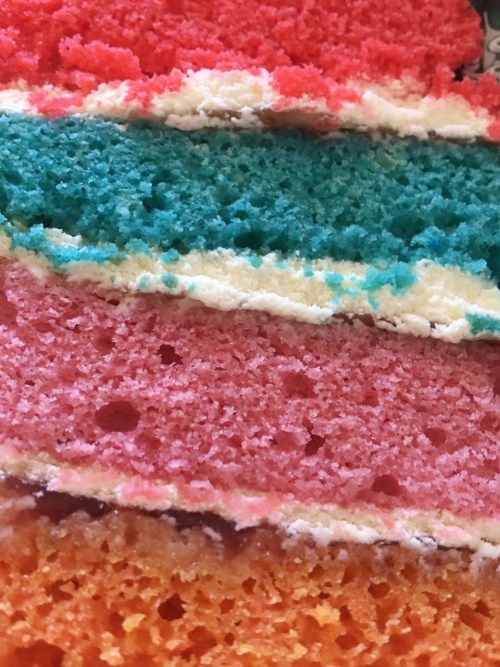
rainbow cake

My daughter and I baked my wife a birthday cake. As my daughter is coeliac, it is gluten free.

So we baked five different coloured cakes using Dr. Oetker’s Colouring Gel.

Recipe

Take one egg and put this on your balance scale.

Weigh out an egg weight of caster sugar.

Same weight of soft butter.

Cream the sugar and butter.

Before adding the egg, weigh out an egg weight of Gluten Free self-raising flour, then add the egg to the butter and sugar mixture and add some vanilla essence. Now add the colouring gel, we added a fair bit to have a strong colour.

We had a

Red cake using red colouring gel.

Blue cake using blue colouring gel.

Pink cake using pink colouring gel.

Orange cake using strong yellow colouring gel with a hint of red gel.

Violet cake using red and blue gels.

Mix the egg, gel, essence into the creamed sugar and butter.

Then fold in the flour, until the mixture is smooth.

You could add a little milk if you want to have a smoother batter.

The cake mixture was spread into a six inch cake tin and baked at 180℃ for about 15 minutes.

The cakes were left to cool and then the cake was built with a whipped cream and strawberry jam filling, dusted with icing sugar and served with sugar flowers.

Roasted Cauliflower

Roasted Cauliflower

One of my new (for me) favourite foods is roasted cauliflower.

Take the cauliflower and break into florets. I then cut the florets in half so that I get better caramelisation and a better looking dish.

Heat a pan and add butter. I usually add a little olive oil to reduce the risk of the butter burning.

I pan fry the cauliflower with lots of foaming butter, before transferring to a heated roasting pan for 10-15 minutes.

If you have an ovenproof pan then, put that straight into the oven.

I sometimes use a grill seasoning to add additional flavour.

Beef and Mushroom Stew with Dumplings

Beef and Mushroom Stew with Dumplings

I do like my slow cooker, but I certainly could use it more often, if I had the time! My most recent recipe was a beef and mushroom stew with dumplings.

To make this I took some shin of beef, which I cubed and then coated in seasoned flour. This was then browned in a pan before placing it in the slow cooker. The flour not only helps with the browning process but also helps thicken the stew during the stewing process. In the pan I used to brown the meat, I then added some carrots, leeks and onions. You could at this stage adding some other root vegetables such as parsnips or swede. These were cooked in the pan for a short time before also adding to the slow cooker. I then added some water from the kettle to the pan to deglaze it, before adding it to the slow cooker as well. I then topped up the slow cooker with water to not quite cover the ingredients.

I then added a Knorr Rich Beef Stock Pot. I quite like these stock pots, not just for the flavouring, but how they thicken the stew as well. One of the challenges with a slow cooker meal is that the sauce doesn’t thicken in the same way that cooking in a oven does.

The stew was then cooked in the slow cooker on the medium setting for four hours. My slow cooker has two settings, low for eight hours or medium for four hours. Though you can change the time manually.

After four hours the stew was allowed to cool and was then left overnight. I do like leaving stews or casseroles to “stew” overnight as it seems to improve the flavour.

The next day I put the stew in the “normal” oven.

I then cooked some bacon lardons in a pan and once nearly cooked added a range of mushrooms. I used chestnut mushrooms, some chanterelles that I had alongside a range of woodland mushrooms. These were cooked lightly before the bacon and mushrooms were added to the stew and stirred in.

I have been using the woodland mushrooms from Morrisons for a while now. Now I know they are not from woodlands, but are farmed, but they make a nice difference to dishes that usually use common mushrooms. The woodland mushrooms include oyster, and some others that I haven’t identified! According to the Morrisons website the pack contains three of the following: oyster, shiitake, eryngi, maitake, shiro shimeji, enoki, and buna shimeji.

Woodland mushrooms

Tesco use to sell wild mushrooms in my local branch, however they haven’t for a while, but you may be luckier at your own branch.

Wild mushrooms

The chanterelles on the other hand were found amongst the range of exotic mushrooms mini packs that they do stock in my local Tesco. This range includes varieties such as oyster, shiitake amongst others.

Exotic mushrooms

On top of the stew I added some dumplings and the whole thing was cooked for about 25-30 minutes. The idea was that the dumplings would have a nice crust and the stew would be bubbling underneath.

Overall the stew was lovely, full of deep flavours. The beef was tender and melt in the mouth, whilst the vegetables still had texture. The bacon and mushrooms added a new dimension and by adding them later in the cooking stage they weren’t lost within the stew.

Yes I will be cooking this again.

Thai style stir fry

Thai style stir fry

I do like Thai food, one of my favourite places to eat in Oxford was Sais’s Thai in the covered market. As I have never actually been to Thailand I couldn’t say whether what they cooked was authentic, or typical of the cuisine. What I can say, is I really liked their food and what they served. I have tried quite a few times to recreate the experience at home, sometimes with an element of success and sometimes it was just okay.

For this recipe I took some chicken thighs and cut them into strips, I prefer using chicken thighs over chicken breast, as the flavour is much better and it cooks better in a stir fry, staying moist and tender, whilst breast can dry out.

The chicken is mixed with soy sauce and I used some rice flour (one of the family is on a wheat-free diet). I mixed the chicken until it was all evenly coated.

This was then cooked in a some sunflower oil in my trusty wok. The chicken is stir fried until just cooked and removed from the wok. What happens next depends very much what is in the house and in the fridge.


First goes some garlic and usually a combination of onions, pak choi, green beans (or mange tout), sliced mushrooms, baby sweetcorn, broccolli, basil and spinach. I had fish sauce and more soy sauce. You can add some chopped red chilli for heat if you want. I do like to get Thai Basil if I can, but I have found normal Basil an okay replacement. This is all stir fried, and when this is nearly cooked, the spinach has wilted, I add back the chicken and some cashew nuts. A little more stir frying before serving on a dish (and sometimes topping with more cashew nuts).

I find this quite a simple, yet very tasty dish, serve with plain steamed rice or noodles.

Reindeer Cupcakes

Reindeer Cupcakes

These are the Reindeer cupcakes we baked last year, we are intending to bake them again this year. Lots of fun to make and the salted pretzels add a little something different.

The first stage is to make some chocolate cupcakes, I have a simple recipe that I use for cupcakes and the quantity can be increased quickly and easily simply by increasing the number of eggs.

The recipe is based around a single egg.

Ingredients

One egg
Same weight of self-raising flour, butter and caster sugar
One tablespoon of cocoa powder

Cream the caster sugar and butter together until smooth.

Add the egg and a little of the flour. Mix until smooth and then fold in the remaining flour and the cocoa powder.

Place spoonfuls of mixture into cupcake cases and bake in a medium oven for ten minutes. Once cooked, cool before decorating.

The cakes are covered in chocolate buttercream icing. Pretzels are used for the antlers and marshmallows for the eyes, spotted with black icing. The noses are homemade biscuits with a giant chocolate button, except for Rudolph who has a red icing nose.

Baking Biscuits

IMG_0362

I have a very simple recipe for some simple biscuits. The recipe is based around a single egg.

Ingredients

One egg
Same weight of cold cubed butter and caster sugar
Twice the weight of plain flour

Rub the flour and butter into breadcrumbs.

Stir in the sugar and then add the egg to bind the mixture into a dough.

The mixture should come into a dough quite easily.

I then form the dough into a large sausage shaped roll, about 3-4 cm in diameter. I then wrapped the dough in cling film and placed in the fridge for an hour or so. This is to firm up the dough and make it easier to manage when slicing into biscuit shapes.

Removing the dough from the fridge, I sliced it into rounds which are then placed onto a baking tray. Now you can placed them onto a greased tray, but I usually use baking parchment. One tip I picked up from Jamie Oliver was after cutting the parchment was to screw it up into a ball and then flatten the screwed up parchment. What this does is make it much easier to line the baking tray, otherwise the parchment as a tendency to roll back into a roll.

These are then baked in a moderate oven for about 10-12 minutes until film. I prefer my biscuits just cooked, not browned, so they have a softer crumbly texture. If you prefer a crisper biscuit then bake for a little longer.

Once baked, remove the tray of biscuits from the oven and place on a cooling rack.

Once cooled, you can then ice the biscuits or cover them in chocolate.

Time for a new pan

paella

I do quite like cooking paella, and though I’ve not talked about it for a while on the blog, it has made regular appearances on the dining table. One thing I have been thinking about for a while was buying a paella pan to cook it in. I have been using a regular frying pan, but the idea behind using a special paella pan, was to ensure a more authentic dish. This would be achieved by having a broader pan, the resulting paella would be shallower than using the regular frying pan. It would also ensure that I didn’t need to stir the paella, which I have been told now is something you don’t do with paella. So when I was out shopping in Bristol recently I treated myself to a new 40cm paella pan.

For my most recent paella and using the new pan for the first time, I took some diced onion, pepper, mushrooms and courgette. In addition I also threw in some diced chorizo to the pan. After heating a splash of olive oil in the pan, I fried the vegetables and chorizo until they were soft.

I use a variety of methods when adding flavour, from making my own seasoning mix using saffron and paprika, to using shop bought seasoning mixes or pastes. For this paella I used the Marks & Spencer’s paella paste, this contains saffron, but also gives the paella a rich fruity flavour. The paste was added to the pan and mixed with the cooked vegetables.

I then added the paella rice. It makes sense to use the right kind of rice when cooking paella, to ensure you get the right texture. This was coated with the rest of the ingredients and then I added some white wine, before adding the stock to cover all the ingredients.

This was then left to cook over a simmering heat for 30-40 minutes, and I didn’t stir. Though after 25 minutes I did add a little more stock to the pan.

In separate pans I cooked the chorizo and the squid. The chorizo I used was the cooking chorizo, sliced into 4-5mm slices. This was cooked off in a medium pan with a little olive oil. They certainly sweat oil out and this combined with the paprika can stain, so be careful. For this paella I used regular squid, this was scored with a sharp knife before been cooked just before serving in a hot frying pan.

The dish was then constructed, the cooked squid and chorizo was placed on top with chunks of lemon, then served.

Delicious, and went down well.

Homemade Quiche

Quiche

I haven’t made quiche for a while now, but over the weekend decided to throw one together.

I made some shortcrust pastry and baked it blind in the oven in a flan tin. Everytime I do that I always think I should be using some baking beans, but I don’t have any, so I lined the top of the pastry with baking parchment and used another pan on top to keep the pastry flat. One tip I picked up from the television was to fold the pastry over the edge of the flan tin and once cooked this is carved off, and creates a level pie base.

I filled the base first with some fresh spinach and the cooked onions, peppers, mushrooms and pancetta. I then added some grated mature cheddar cheese. There are lots of choices when it comes to quiche fillings,

I placed the flan in the oven and then filled it, covering the rest of the filling with an egg and milk mixture.

The quiche is then baked in the oven until the egg has set and the top of the quiche has started to brown.

Delicious warm, it can also be served cold with salad.

Lighter Flapjacks

I used the following recipe to make some lighter flapjacks.

150g unsalted butter
75g brown sugar
75g golden syrup
350g of oats
50g of rice krispies
50g of cashew nuts, or use peanuts

In a pan place the butter, sugar and syrup together. I find one way to measure the golden syrup is to put the pan on the scales, zero the scales and then add the syrup.

I put the pan on a low heat, better to take your time than burn the mixture. Once the sugar, butter and syrup are bubbling slightly take it off the heat and stir in the oats.

The stir in the rice crisps and nuts, now I should add at this point I actually used coco pops, but the principle is the same. The cereal provides a lighter crunchier texture to to the flapjacks. The nuts provide a harder crunch to the flapjacks.

This recipe uses more oats than my previous recipe, so these flapjacks are less rich and sticky. Place the oat mixture into a lined tin, press it into place with a fork or the back of a spoon.

The flapjacks are baked in a pre-heated 200ºC oven for about ten minutes or until the edges are browned.

Leave the flapjacks to cool in the tins, or they will fall apart. After they have cooled, cover in melted chocolate, let it set and then serve.